As of October 2020, you now have the ability to apply custom CSS to your Nutrifox labels! If you’re looking for some tips to help you customize your Tasty-style labels, you’ve come to the right place.
How to Add Custom CSS to Your Nutrifox Labels
- Log into Nutrifox
- Click Settings
- You should see a Custom CSS box where you can customize your labels
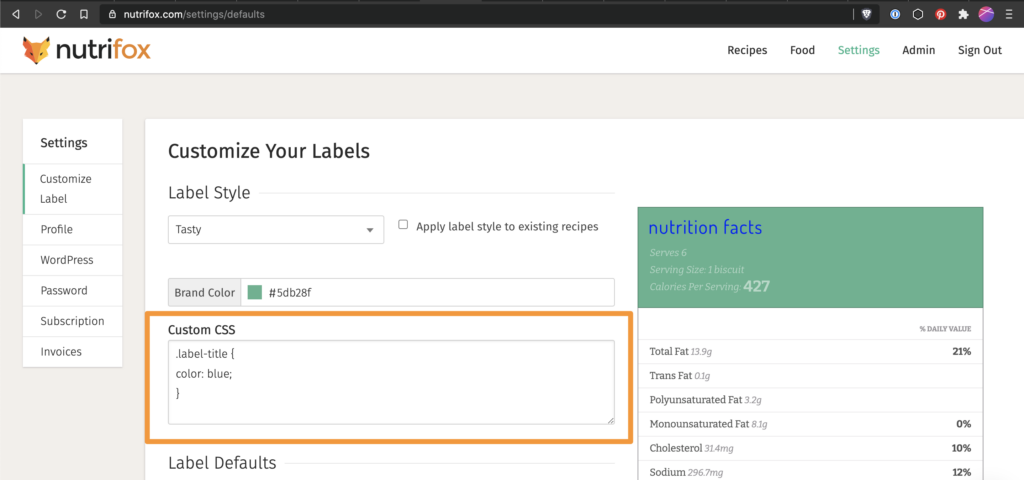
The customizations you add to the Custom CSS box will appear on the label preview in real-time. Here’s a quick video to show you how it works:
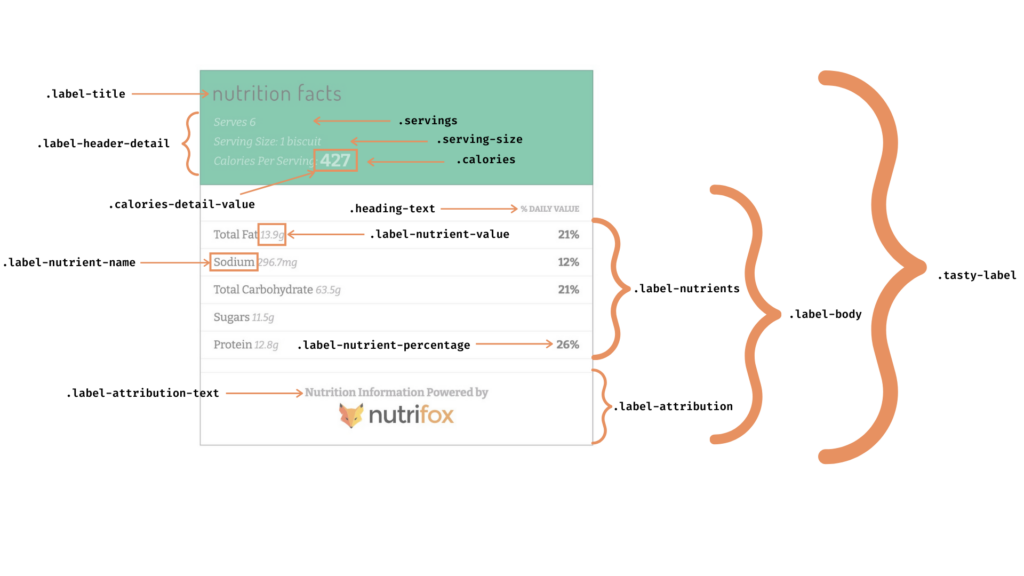
Tasty Label Classes
You can use these classes to change the look and feel of your labels with CSS (right-click the image and click ‘Open Image in New Tab’ to view it at a larger size):
⚠️ IMPORTANT: The CSS you add to the Custom CSS box will apply to all of your labels as soon as you scroll down to the bottom and click Save Changes.
If you’re using two or more label styles on your blog or website, the CSS you add could affect the look of all of your labels. To adjust the CSS of only the Tasty label style, you’ll want to append .tasty-label to the beginning of every CSS property you customize in this Custom CSS box like this:
.tasty-label .label-title {
color: white;
}
This will ensure that you’re only adjusting the color of your label titles on your Tasty-style labels.
General Tips:
1. If you want to change the header background color, you can do so by setting a Brand Color on the Customize Label page in your settings.

2. Here are some common properties you might want to use as a starting point:
background-color: #eb0707; changes the background color to red
color: white; changes the font color to white
font-family: 'Comic Sans MS'; changes the font to Comic Sans
font-style: normal; eliminates any bolds or italics on a certain element
border: none; removes all borders around that element
3. If you want to change the color of all of the text on your label, you can add this code:
* {
color: #ffffff; /* change the hex code to your desired color */
}
4. Similarly, if you want to change the font of all of the text on your label, you can add this code:
* {
font-family: 'Comic Sans MS'; /* change the font to your desired font */
}
5. Using a Google font? No problem. You can import that font at the top of the Custom CSS text box.
For example, if I wanted to import Roboto’s 400 font weight and use that font on my labels, I could add this to my Custom CSS box:
@import url('https://fonts.googleapis.com/css2?family=Roboto:wght@400&display=swap');
Then I could use font-family: Roboto; on any of my classes.
Click here to learn more about importing Google Fonts.
6. Certain style not showing up? Try adding !important to the end of the value like this:
* {
color: #ffffff !important;
}
Last note!
This is a living document and a new feature on Nutrifox, so if you want to customize your label, but you’re not quite sure how, let us know!